Installing a Brass Shim into a Golf Club Head
Occasionally clubmakers will encounter times when the proper sized shaft is not available, whether in their stock or if one does not exist at all. One option for clubmakers in these situations is to install the shaft into the hosel with an appropriate sized shim.
 A shim is simply a thin strip of material designed to fill a void or gap. While Hireko has offered plastic ferrules or adapters in the past for such applications, we are now offering two different sized brass shims to fit the majority of applications you may run into during your clubmaking or repair work.
The two sizes are standard and oversize. Standard size fits in applications where there is approximately a 0.015” gap such as 0.335” shaft going into a 0.350” hosel or a 0.355” taper tip shaft into a 0.370” hosel. These weigh in at mere 0.75g each leaving virtually no change as if the correct sized shaft was used. The oversized brass shim fits in applications where there is approximately a 0.030” gap such as 0.335” shaft going into a 0.370” hosel or a 0.370” shaft into a 0.395” – 0.405” hosel. These weigh just 1.6g each or a little less than the weight of a ferrule.
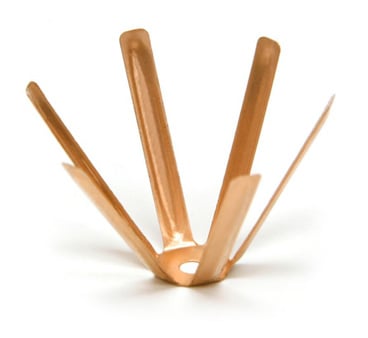
How they work is they slide over the tip of the shaft and then when inserted into the hosel the sidewalls collapse and become wedged between the shaft and interior of the hosel.
Click here to buy Brass Shims
Watch the How-to Install Brass Shims Video
Steps on How-to Install Brass Shims
Quick primer on how to use brass shims
One of the first things you will need to do is gather all your necessary components to begin your assembly or repair. One tip I can share with you which I find it helpful to use our Ferrule Block to help get the brass shim started as they are usually a force fit into the hosel. For instance, if I want to use a 0.355” shaft into a .30” hosel, I’ll set the standard sized brass shim (JJSHIM-STD) into the 0.370” hole and then take the shaft and insert it into the center of the shim.
Next I push down until the shaft is seat and the walls of the shim will collapse and form around the shaft. The shaft will come out fine, but you may have to use something to pry the brass shim out of the Ferrule Block. Be very careful with the brass shims as you can cut yourself if you are not paying close attention.

After which I can test fit the shim / shaft to make sure it will start into the hosel, but I don’t want to put it all the way down yet. You may find that you are able to skip these steps and use the head to drive the brass shim in place. Like anything new, there is a slight learning curve as what procedure works best in your shop.
Remove the brass shim from the shaft tip and set it aside as you will want to partially install the ferrule. Make sure you don’t seat the ferrule down all the way as you have to account for the thickness at the bottom of the shim as well as any lead tip pin (if necessary). Setting the ferrule 1.0” above the shaft tip is all that will be required to clear the collapsible fingers of the shim.

You will still need to use a high strength shafting epoxy on the shaft tip and on the outside of the shim for a good solid bond. It is a little more messy than normal because you have the shim on the tip that will spin around when applying the epoxy but you’ll get the hang of it quickly. Also, there will be no need for shafting beads in this situation. Make sure to fully seat the shaft and brass shim to the bottom of the hosel as it will be a force fit. This may require tapping the butt of the shaft on the ground with some force while you have a firm grip on the head and the shaft. Once you have fully seated the ferrule, clean up the excess epoxy and let the club sit to fully cure.

That’s all there is to using brass shim in the cases you encounter a situation where you have a larger sized hosel than the shaft you are using.