Boring Out Hosels – Taper Tip Heads and Crocodile Tears
You have 3 choices when it comes to boring out hosels – what is right for me?
You might know a golfer (or be one yourself) who has had a favorite set of irons or wedges for a number of years. But as we all get older, you find out one needs a shaft that is either lighter, more flexible or both. You go to pull the shaft or take it somewhere to do the work only to find out that the hosels are tapered and your options are very, very limited. How limited? We’ll get to that point later.
Cue up the crocodile tears
I am not one that is going to weep crocodile tears in this situation as I have had to confront too many customers in this predicament. I simply give them their options and let them decide. The first suggestion is to pay through the nose for a taper tipped shaft if it exists at all in the flex and specifications the customer requires. The reason I say exists, you will only find very few senior flex taper tip graphite shafts in our entire catalog. Hey, that is at least more than all the L-flex shafts you will find. It is also one more than all of the senior flex steel shaft manufactured today. Sure, you might be able to soft step some of the lighter weight R-flex steel shafts. But if you are on a strict budget, you are going to be in for sticker shock. For those of you unfamiliar with that term, soft stepping refers to the assembly practice of choosing a longer than normal raw length taper tip shaft for the clubhead than suggested by the manufacturer to make it more flexible. Even with this option, you may not be able to get down to the flex you require.
If you are asking why so few choices, It all comes down to a matter of economics. The component industry has worked primarily with parallel tip shafts only. Yes, there are a number of OEMs who use parallel tip shafts too, but many still use taper tip shafts in their irons and wedges, especially those devoted to better players. Those shafts are often made to order for a particular club manufacturer who is going to order thousands upon thousands at a time to fulfill production. A component supplier doesn’t have access to those same shafts. Even if one did, they might sell a few dozen of each raw length and that is not worth the investment for the component distributor or the shaft manufacturer. Enough said…
Option number two
The second option I give is to re-bore the hosel out to accept a 0.370" parallel tip shaft. If you are wondering if that will cause any problems, the answer is no. This is done routinely by clubmaking and repair shops and it only removes a couple grams of weight. Sure, it might hurt the resale value of the clubs, but is that why you bought them in the first place? I’ll show some tips on re-boring in a bit.
Winner, winner, chicken dinner
In either case mentioned above it is going to cost money for labor just to re-shaft as well as the option of re-boring the hosels out to accept far more options. Remember, you (or your customer) have had those clubs all these years and hopefully you go your money’s worth. Don’t be surprised at all if you opt to have the clubs re-shafted and/or re-bored, it is likely to be more money than you bought them to begin with! You may find that you could get a brand spanking new set of irons or wedges with the shaft weight and flex you need for less. The going rate to re-shaft a single club is $18.95 (not including the cost of the shaft) and re-boring may be another $9.95 per club. Not only is time money, but so is some of the equipment necessary to do the job properly.
Re-boring the hosel
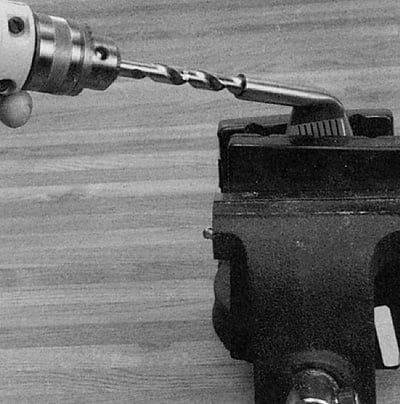
What are you going to need to re-bore an iron or wedge correctly? If you think a vise, pair of vise clamps, electric hand drill and a 3/8” or 9.4mm bit is all you need you may be in for a little surprise. You’ll need strong wrists because the first time the drill bit seizes up in the hosel, you will have wished you never tackled the job. It can be done (more easily on forged irons), but taking it slow is the key. You may even want to start out with a smaller drill bit, like a “U” size letter bit, so you are taking less material at a time if re-boring by hand.
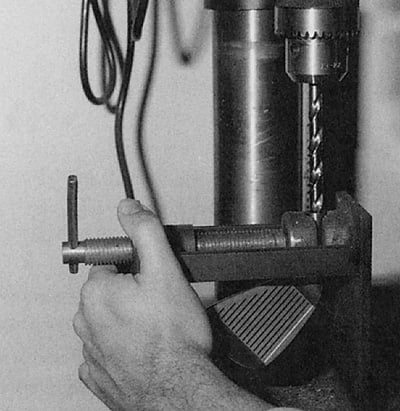
 The preferred method is using a drill press with a special fixture C-clamped to the base to hold the hosel directly below the drill bit. Obviously this is the set up for a large shop and not for the do-it-yourselfer.
Whether by hand or machine, use slow speeds. Plus use cutting oil to cool down the bit and prolong its life. If you are re-shafting with graphite shafts, you will also need one additional step of countersinking the top of the hosel to prevent premature shaft breakage.
Decision time
As I see it you have three options; pay through the nose for the shaft specifications you need (if available at all), re-bore the hosels to accept the more plentiful parallel tip shafts or get into the 21st century by buying a brand new set of irons or wedges with shaft weights and flexes suited to your (or your customer’s) strength. But if you decide to re-bore the hosel, hopefully you have a better understanding of what is required and the best method to accomplish the job.
More information of re-boring of a hosel can be found in the Modern Guide to Clubmaking 6th edition.
