How to Understand Golf Shaft Trimming Charts
For new clubmakers, one of the most intimating procedures in the assembly is the trimming of the shaft, but it doesn't have to be. This short tutorial will explain why and where we trim a golf shaft, where to find the trimming instructions and well as how to interpret the charts and cut both steel and graphite shafts the correct way.
Why trim or cut a shaft at all?
When the manufacturers make a shaft, they do so in mind that is could be used for a wide number of golfers and applications, so the manufacturer makes the shaft longer than it will most likely be used in the final golf club. The number one reason for making the shaft longer is to accommodate taller players so they won't need to add shaft extenders to achieve their final club length.
It is also important to understand each golf shaft tip trimming chart show how much (if any) to take off the tip end (the skinny part or where the head will be attached). The trimming charts will not tell you an amount to take off the butt end (the fat part where the grip is installed). Cutting the butt end to length is assumed after the tip trimming or sometimes called "tipping" a golf shaft is performed and installed onto the head.

What is the importance of tip trimming?
In certain cases, you will not cut a shaft at all from the tip end. This may be due to the shaft is designed for a putter, driver, a hybrid or an iron or wedge requiring a taper tip shaft. Parallel tip shafts (where the shaft remains a constant diameter from the tip up a specified distance up the tip) will most often require some tip trimming. This is required to offset the increasing heads weights as the clubs become shorter and maintain the flex the manufacturer designed into the shaft for a finished club. So, there is a rhyme and reason behind tip trimming.
Where to find the trimming instructions?
There are several ways to access the tip trimming charts. At Hireko, we have made it easy and convenient by locating these invaluable charts in 3 different places. The first is our master charts for all the shafts we carry on our website. Simply click on the first link and you will find a comprehensive list including special notes as well as suggested length for each club.
CLICK HERE TO THE LINK OF THE HIREKO MASTER TIP TRIMMING CHART
The second place on our website is the product page of the shaft you will be buying and installing into your club. Here is an example of the SK Fiber Tour Trac 75 iron shaft.
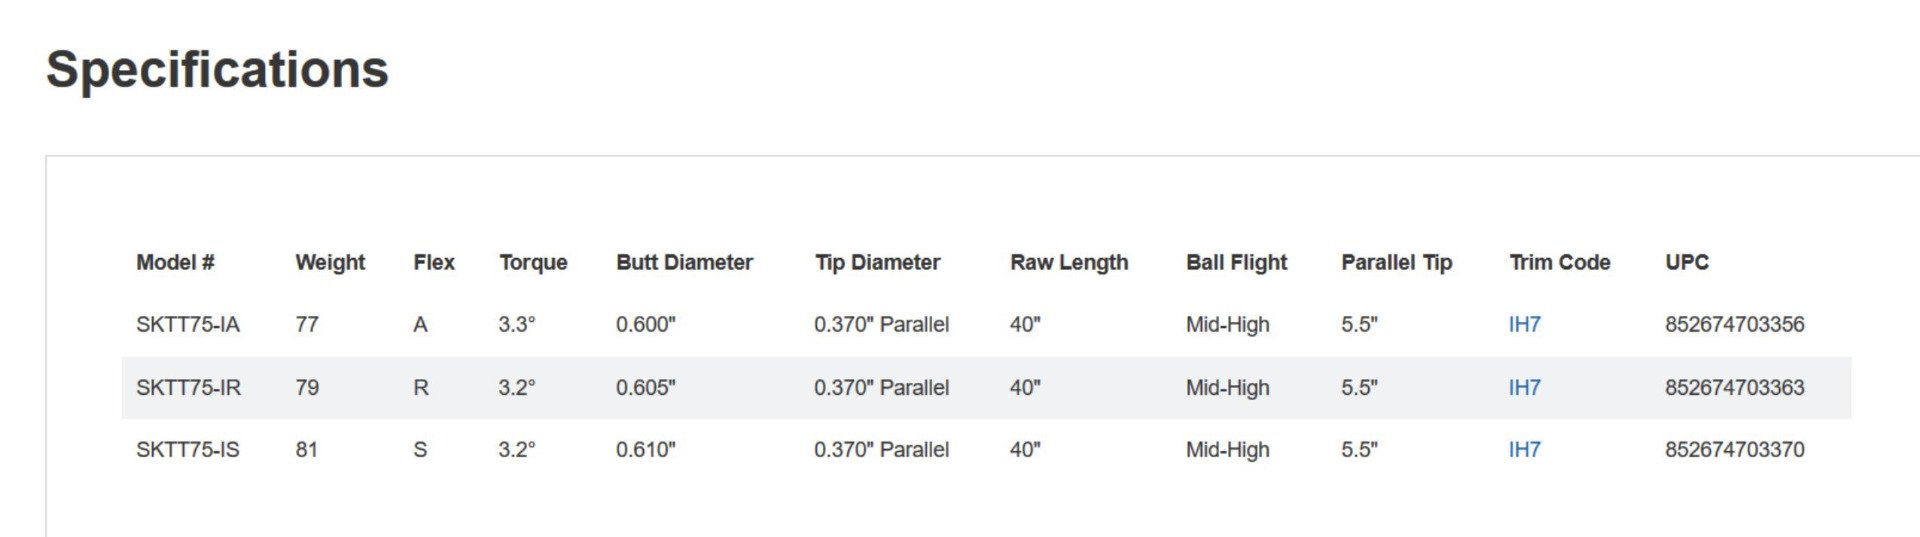
Then scroll to the right until you see the column Trim Code. If you click on the blue IH7 in this case, it will go to a page which may look something like this.

For instance, the 4i would represent a #4-iron and the 0.75 in would tell you to trim 0.75" from the tip.
If you rely on our printed catalog, then you want to the shaft and look at the specification box which includes tip diameter, weight, length, etc. Look where it says TRIM CODE and it will tell you which chart to use. Again, it is IH7 in this case. To Find the IH7 chart, it will be with the rest of the tip trimming tables located on the inside back cover of the catalog. It is that easy!

Lastly, you can also consult the manufacturer's website.
How to interpret the shaft trimming charts
Now that we know which shaft trimming guide to use and where to find the charts either on-line or in the catalog, the next thing we need to do is understand how to determine the correct amount of tip trimming for each club.
We first locate the trim chart we want to consult on the left. Next, we want to identify what club number we are going to install the shaft into. Where the horizontal trim chart box and the vertical club # intersect is the amount we want to tip trim. In our example, where IH7 and the #7-iron intersect tells us 1.5". This is how much to tip trim. After which we will butt trim to our final length.

If you look closely at this chart look on the left at IH19. It is devoid of any numbers on the right. In this case if this was the chart suggested for the shaft you were using, then you would not tip trim at all; rather all the material to be taken off will come off the butt end.
How to trim combination flex shafts
Occasionally you will see where a shaft may have more than one option on tip trimming a shaft. These "combination flex" shafts are designed to reduce inventory by being able to create multiple flexes from a single shaft rather than produce two different shafts. Here are the most common ones below.
| Combination Flexes | Manufacturer’s Designations |
| L and A combination flexes | A&L or A/L |
| R and S combination flexes | R&S or R/S |
| A and R combination flexes | A&R or A/R |
| S and X combination flexes | S&X or S/X |
For instance, if you see R: IH17 / S: IH22, then you would use trim chart IH17 for R-flex and trim chart IH22 for S-flex.
Read the small print
Occasionally you may encounter a special trim note with a shaft. These will apply to specific shafts or in certain cases. Make sure to read those carefully.
Measure twice, cut once
Lastly, if you ever have questions on exactly how to trim the shaft, consult the company you purchased the shaft from (hopefully Hireko) or the shaft manufacturer. If you were to trim the shaft incorrectly, it will not be covered under warranty and potentially be a very costly mistake. For more information on tip trimming shafts, please consult the Modern Guide to Golf Clubmaking book.
 |
| Shaft Cut-Off Wheel |
 |
| Rod Saw Blade |